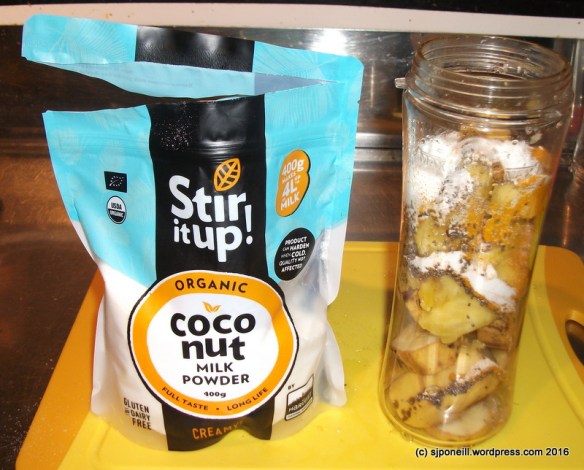
A couple of weeks ago, I journeyed down to Palmerston North for a meeting with a local MP. I had a few errands to run before heading north again, one of which took me to Spotlight for some voile to make my own nut milk bag. The Spotlight shares a car park with New World so I popped in there in search of some of this:
The Stir It Up line of non-dairy milk powders (almond, coconut, oat and soy) was launched a few weeks prior but had been slow to appear on shelves. My previous supply of coconut milk powder having dried up, I’ve been keen to give it a go.
Anyways, New World had nice big juicy oranges for 99 cents/kg so I mega stocked up; looking back I should have bought twice as much for juicing and freezing. The trouble with juicing oranges is having to peel them all so, being inherently lazy, I googled a solution…which said…peel the oranges…
My quest did lead me to a site – now forgotten – that listed fruit that could be juiced unpeeled – the short version is most of them less citrus – and extolled the virtues of unpeeled banana…it seems that the lowly banana peel is rich in serotonin which helps keep the demons away of grey winter days…so…
…remember to take the sticker off – it’s not rich in serotonin – and give the banana a good wash to remove anything unhealthy…hack the ends off and dice the rest up peel and all…
…slice off and dice up a centimetre ring of pineapple…
before tossing in a tablespoon of chia seeds – don’t put these in first or they will just glug up at the bottom of the mug – a teaspoon of turmeric (organic from Hardy’s), and four teaspoons of coconut milk powder: this is about the same as a cup of coconut milk. Add filtered water up to the mark, blend, fill to the top with water and blend again.
And that’s half of tomorrow’s lunch done…
I’ve been blending unpeeled bananas for a week or so now with no detrimental side effects…I wouldn’t say that there’s been a big surge of serotonin-based benefits either but it does reduce waste and I am now keen for another crack at banana peel cake, using the kumara cake base from a few weeks ago…
A month or so ago, we had a series of minor domestic disasters that led to a flood under the kitchen wall into the back pantry. During the resulting rapid relocation of the pantry’s contents, I uncovered a dehydrator. I always sorta kinda knew it was there but had never been that inspired to pull it out and give it a whirl.
Post-disaster, since it was already sitting out there on the pool table, I removed the labels – it had never been used – and downloaded the manual. My first victim was a pumpkin that was at risk of passing its best-by date. Three -quarters of it, peeled and diced into 1cm chunks, nicely filled the dehydrators five trays.
I found that the recommended drying time was out by a factor of two i.e. I had to dry the pumpkin chunks twice as long as recommended in the manual. It doesn’t draw much power but is fairly noisy so it’ll be relocated into the newly-dried pantry for future dehydrating missions.
Three-quarters of a largish pumpkin shrank down to about three cups of pumpkin chips.
Initially this was just a bit of an experiment and a useful fate for a pumpkin that was overstaying its welcome in the fridge. I wasn’t actually too sure what I was going to do with the end product. Then I saw this recipe in the Sunbeam manual…
Ingredients
2 cups self-raising flour
Pinch of salt
2 cups dried pumpkin pieces
2 x 125g cans creamed corn
¾ cup extra light sour cream
½ cup coarsely grated reduced-fat cheddar cheese
2 eggs, lightly beaten
80g butter, melted
1 long fresh red chilli, finely chopped
2 tablespoons mixed sunflower and pumpkin seeds
Directions
Preheat the oven to 180C. Spray an 11 x 21cm loaf pan with cooking oil. Line the base and two long opposite sides with non-stick baking paper.
Sift the flour and salt into a large bowl. Add the pumpkin, corn, cream, cheese, eggs, butter and chilli. Stir the mix until just combined and spoon it into the pan, smoothing the surface.
Sprinkle the seeds over the top. Bake for about 1 hour 5 minutes or until a skewer inserted into centre comes out clean.
Transfer the loaf to a wire rack to cool slightly. Cut it into slices and serve warm.
It tastes great but is very heavy: a 1cm slice is a good light meal for me. I just drop it in the toaster til it’s nicely toasted and spread a thin layer of butter over the top. Tonight though, I used a very thin layer, maybe 1/2 a teaspoon, of chilli oil instead of butter…yeah, baby!! That rocked!!
In Seeing corn in a new light, I speculated whether heat was the catalyst for the chilli effect in this oil.. After tonight’s experiment, I can confirm that this chilli oil is definitely self-initiating…
Insights
The pumpkin rehydrates nicely which is good. it is probably also too much pumpkin for a single loaf.I think it couple safely reduced by half especially if the chunks can be run through the grain mill (on a very coarse setting) into smaller bits.
The suggestion of a single chilli is ridiculous: this small amount is completely overwhelmed by the pumpkin and corn. 3-4 long chillies would be more effective.
Two cans of cream corm is overkill. I think that one can plus a cup of either coarse corn meal or drained corn kernels (or a half and half mix of both) might make this loaf less heavy (or more light).
The pumpkin and corn also beat up on the cheddar cheese. This might be better – in a smaller quantity – as topping added just before the loaf is removed from the oven i.e. just melted over the top…
Since I am now doing my own wheat grinding, the next version of this loaf may also use home-ground flour instead of store-bought flour. My goal is to ultimately only use home-ground wheat for all baking, reserving store-bought for mundane tasks like kneading surfaces…
It is so fantastically simple, you almost expect it to come with Admiral Ackbar’s warning…
…but it is this simple…take all of this:
2 and 1/4 cups of rolled oats
1 cup of pumpkin puree
1/2 cup of maple syrup
2 eggs
2 tablespoons of LSA. (ground linseed, sunflower seeds and almonds)
1 tablespoon of vanilla extract
3 tablespoons of oil (I used coconut oil)
1/4 cup of milk (I used almond coconut milk)
1 teaspoon of baking powder
1/2 teaspoon of baking soda
1/2 teaspoon of salt
1 teaspoon of cinnamon or nutmeg (nutmeg because it was the first one I saw)
1/2 cup of dark chocolate chips (I used white chocolate buttons because a. I don’t like dark chocolate that much and b. I have a bag I bought for our deluxe extreme bread and butter pudding before Terri and I figured that the white chocolate chips got better distribution through the mix)
…and dump it in the blender and stir it all up for a minute or so before spooning the mixture into muffin trays.
Bake them for 20-25 minutes at 180 degrees.
When they’re done i.e. browned on top and a skewer comes out clean, take them out and let them cool for half and hour or so before taking them out of the trays.
Baking cakes is not yet one of my fortes…I can do a mean beetroot chocolate cake but I’m not really a chocolatey type – note to self: try it without the chocolate or significantly reducing it – and so what’s the point…The banana peel cake was OK but fairly bland and had enough sugar in it to excite a kindergarten of pre-schoolers…
Toasted
I’m getting right into coconut as a core ingredient and bought some coconut flour from Hardy’s in Taupo to try it out as an alternative to wheat flour and because I like trying new things our.
Preheat oven 170C. Line and grease a 25cm springform cake tin.
In a small saucepan gently melt the coconut oil until liquid. Remove from the heat and whisk in the honey. Add the eggs one at a time whisking well between additions, then add the vanilla and lemon juice.
Combine the coconut flour, baking soda, salt and desiccated coconut in a large bowl. Pour over the egg mixture and whisk thoroughly to combine. The mixture will be quite wet but the coconut flour will absorb a lot of moisture as it bakes.
Pour into the tin and bake for 30-35 minutes. Check with a skewer.
Remove from the tin and cool completely on a cake rack.
The cake itself was quite easy to make but came out a bit dry but I’ll take responsibility for that – got distracted with someone else and left it in the oven an extra five minutes or so. I also didn’t read into the comment about the coconut flour soaking up a lot of the liquid in the mix. I dallied before pouring it into the baking dish: it started to set in the bowl and didn’t lie smoothly in the dish.
It was the icing that destined this cake to be recycled. Because the top was so uneven, I caked the icing on thicker than was good, so thick that the taste and smooth texture of the icing overwhelmed the cake buried beneath. I should have delayed using this icing recipe until I had some more natural coconut i.e. other than the supermarket coconut that the recipe warned might be too dry and/or defatted. I couldn’t get it to breakdown into butter so I added more coconut oil which kinda worked – if it hadn’t been so thick.
I did try toasting the top of the iced cake to see if that lightened it up at all. It was a slight improvement and would have worked had the icing not been so damn thick.
Ready to recycle
The cake and the icing are both largely coconut so, deeming this particular attempt sub-optimal, I recycled it through the blender into my growing stash of almond/coconut meal from my increasingly more frequent production of almond coconut milk. On the upside, I shared half the initial production with the taste team at the Ohakune I-Site, and catching up with them today – with some oatmeal pumpkin muffins, they were surprised that I’d thought this mix a failure.
That sub-optimal performance was largely down to me, and mainly in the icing. I bought some coconut chips today from the natural bulk shop in Taumarunui and will give this another go soon…
Efficient use of energy: drying almond coconut meal (mixed with blended failed coconut cake) on top of the woodburner
So far this winter has been more wet than cold…three winter’s ago, we had already had some serious snow by now…
This is a time when root vegetables, carrots, potatoes, parsnip, kumara, etc, are seasonal and thus cheap at the moment. I’ve been investing heavily in freezable storage containers to store the vegetable largesse as soup…
I scored half a large bag of potatoes that survived the ‘Kune Carrot Carnival a couple of weeks ago and scored the net for a variety of tasty light things to do with potato. There are surprisingly few variations on the theme of potatoes, less than consume large quantities of the target vegetable….
Although not a big consumer, this recipe combined potato with chicken and cheese. Like most soups, it is simple and quick to make.
Ingredients
100 grams of butter (probably should have used coconut oil but didn’t think of that at the time)
1 onion diced
3 carrots diced
3 spring onions (the recipe calls for celery but I’ve gone off that for now)
1/3 cup of flour
2 potatoes diced
2 cups of coconut milk (the recipe calls for cow but I don’t have that in the fridge anymore apart from occasional small quantities for guest brews)
1 teaspoon of black sea salt (yes, you could be boring and just use normal salt but I’m trying to stay away from processed foods: if it’s white, it’s bad)
3 cups of chicken stock
1 decent size organic chicken breast (after the Hot Doc’s warning about the growth additives that go into commercial chicken, I avoid it now) diced
1 1/2 cups of grated cheddar/Colby/tasty cheese
Fresh parsley and or coriander, finely chopped
Directions
Melt the butter in the pan
Add the onions, carrots and spring online and cook for 3-4 minutes
Sprinkle the flour over the vegetables and stir it in.
Add the coconut milk, chicken stock, potatoes and chicken.
Bring to the boil and simmer for 12-15 minutes.
Slowly add and stir in the cheese until it has all blended into the soup.
Sprinkle with the parsley and coriander. Serve with stick bread sliced longways, or toasted jalapeño cornbread
I’ll be making this again, for sure, not only is it tasty as and filling. I’ve already had a few requests for it and one can’t ignore one’s fan base. Changes I would make apart from those listed above? Probably only to add a diced parsnip: I forgot I have a bag of them in the pantry: it’s sweetness will go well with the chicken and cheese flavours…
My first thought for this prompt, since I have now apparently joined the ranks of the indoor beanie-wearers, was to simple post a shot of me and my beanie. I must admit that, even though it has only been a week or so, wearing the beanie inside feels so natural that I feel a little lost without it – as I do at the moment after I leaving it at work last night, still plugged into the USB charger…
I’m subscribed – who isn’t? – to a range of forums and sites that have – or had at some point – some fleeting interest to me. Hardy’s is a chain of health food shops and my purchase of flax seed, coconut oil and natural antallergen caps found me subscribed to their blog. Most of the time, I barely scan these things and rarely click on any of the links but Hardy’s caught me in a moment of weakness.
This post is better written than much similar fare and it’s content struck a chord. If you’ve been following my green journey, you’ll be aware that my life has taken a turn for the better following a friend’s chance comment last year. As cynical as I might be about the ‘health’ industry, I can not deny the positive effects on me by reducing the quantity of processed food and sugar in my daily diet.
Of the three changes that the article recommends, I am already sold on the benefits of reducing sugar. It’s not hard and doesn’t require much more than a little thought: sacrifices are minimal and there are still sweets to be had: they just rely less on processed sugar. Occasionally, I miss having instantly accessible munchies in the pantry – it’s been over six months since I last knocked back a big bags of crisps – but an apple or orange fills the same gap and it’s not hard – just needs a little forethought – to bake some healthy cookies…
…although growing external demand often means that there are none left for me…
Brain exercise is an area where I have been negligent…with a lot of other things going on the last couple of years, I have not been as intellectually active as I once was. As much as I love the people side of my job, it does lack on the intellectual front and I am starting to yearn for the same cerebral workouts that distinguished my Army and Air Force roles I don’t want to go back…I just miss the mental workouts…
I know I’ve said it before but one way of taking the grey matter for a run is blogging and if the good people at WordPress are happy to spam my inbox with prompts and number of times a day, that I should be taking some of those ideas and converting them into coherent thoughts and tap them out…I just have to force myself back into the habit..
The final change relates to getting enough sleep. I think that this may be a little chicken and egg, for me anyway. Since starting my green journey, I have been sleeping a lot better but not a lot longer. If I go to sleep before eleven o’clock, I’ll wake around four or five and stay awake, only starting to doze off thirty seconds before the alarm goes off…
Tips for good sleep…?
Make the bed properly…a mussy bed and slip-slidey covers are not conducive to restful sleep.
In winter, crank the ‘lectric blanket: easing between hot sheets is a pleasure I anticipate every night – although Louie has now worked out which beds are warm, which is why the ‘kids’ are now banned form upstairs after lights out.
Build a regular sleep routine. Do one thing, the same thing each night so that your mind learns this as a sleep trigger. For me, it’s to read a little each night before I kill the light; for others it might be a hot chocolate or light coffee before nigh-nighies…each to their own: just kept it consistent…
And here’s a shot of the beanie in all its high tech glory…
Pure…strawberries…no additives…just naturally pure…sweet and tasty…
Thinking about pure got me on the thought path of purify and a chance to review when I am on my green journey. ‘They’ say that you need do something for six weeks before it becomes habit…I’m now six months in to the journey, taking its start from when I purged – in a most unhealthy manner – all the junk foods from the house. It’s now been six months since I had crisps/chips where I used to knock off a big bag at a time; and maybe three months since I last had a chocolate bar: those Whitaker’s L&P slabs are still just too good to walk away from entirely: who would ever have thought that anyone could successfully combine a chocolate bar and a fizzy drink to mindlessly well..?
The journey is pretty stable now: I’ve settled on the core elements and binned some the trial components. I never much liked the rice milk and so that’s gone and I don’t miss the coconut water even though there’s still a bottle in the pantry I need to polish off: for the most part, good old-fashioned filtered water does the trick – pure as well as it come straight off the roof. I’ve stocked up on bulk chia seed, black rice and sliced almonds from Happy and Healthy, and bulk coconut milk powder from Naturally Abundant. Fresh fruit and veges depend on what’s in season – with just a few out of season treats – bananas being the core staple for smoothies and sugar for baking.
I am becoming a creature of culinary habit – not necessarily a bad thing – starting with porridge and stewed apple mixed with a little coconut milk: the cocnut milk adds a great and unexpected sweet twist to the texture of the porridge and semi-tart apple. I follow this with a slab of homemade herby wholemeal toast with apple butter – a new addition to the pantry that is so tasty and simple, if time-consuming, to make; depending of my degree of personal organisation in the morning, toast may be consumed in the car on the way to work. My morning cuppa is evolving as well – it used to be simple Earl Grey with a little cow but now I am looking for a black tea that will blend well with the coconut milk that has replaced cow’s milk almost entirely now. I still keep some 250ml bottles of milk in the freezer for just in case visitors who still prefer something a little more conventional.
I think that I have finally mastered the coconut bannofee smoothie: the key was the coconut milk powder. I now dice a single banana (reduced from the original two) into the blender with a heaped teaspoon of Jed’s #5 coffee and a table spoon of coconut milk powder and zoom it all together for 30 seconds. It’s quick, it’s easy, it tastes great with competing hints of banana, coconut and coffee.
Lunch now is a bannofee smoothie and either a vege smoothie with cabbage or spinach, carrot (for its the ‘Kune carrot season), LSA or flaxseed, and water; or Jen’s pineapple, banana and tumeric smoothie mixed with a 50/50 combo of coconut milk (from the powder) and homemade almond coconut milk. Pre-assembling and freezing a couple of dozen smoothie bags – just add LAS and water – was a good move and, as I polish off the last of the first two batches, I run up some more – I just have to remember to take one out to thaw the night before…
If personal organisation in the morning trends towards zero, and I don’t the smoothies done, not too worry: the Pihanga Cafe in the side of the Chateau does a great and very filling kids menu (burger and chips, pasta, pizza or chicken tenders on a potato mash)for $8.00, $6.00 with a Whakapapa Village community card! Occasionally, I might supplement this with one or two apple oatmeal or almond coconut cookies – both very chewy and filling – or a couple of slices of my jalapeno or kumara bread – now that I have them sussed – toasted…
Dinner is where the variables come out – I am still slowly working to consume all the meat stockpiled in the big freezer. Items like chicken pieces that can be fried go into the air fryer with kumara and potato chips – just got given a big bag of spuds left over from teh ‘Kune Carrot Carnival so need to work on consuming these…watch this space for variations of potato soup themes. Other things that be can be diced or otherwise mixed in, go into one of my repertoire of stews and curries, to be eaten with rice – still currently white but switching to brown once the last of the white is finally gone. That’ll just leave a few small roasts to find something creative and healthy to do with…
So back to my ‘purify’ thought…yes, I think that I am slowly purifying my diet, reducing if not entirely eliminating processed foods and working more and more with the raw (literally) materials…I still get the munchies some evenings but an orange generally deals to these. I know there’s ice cream in the fridge and that I can make a dessert in a cup in minutes but I just can’t excite myself about that sort of food. Don’t panic though..!! I haven’t totally gone off either ice cream or dessert but I’m certainly not hanging out for or consuming either in anything like the quantities that I used to…watch this space for my crack at raindrop cake dessert with ice cream and a passion-fruit (or maybe tamarillo, I haven’t quite decided yet) coulis…
Is it actually achieving anything..? Well…yes…most definitely…although it’s getting into winter here and temperatures are dropping, I’m not eating more so my weight is holding around 87kg; I am sleeping less but way better, and I feel good…thanks Bubble...
Jalapeño corn bread on the left, kumara bread on the right, each less an initial tasting slice….
Life is a little intense at the moment so I have been working quite hard to keep busy…idle hands and all that…
I tend to hoover up recipes that interest me and then have trouble find an opportunity to both cook and consume them…last week a flu-ey friend provided an excellent justification for a bake-athon…which proved unexpectedly therapeutic as well…I didn’t finish til after 1AM but was surprisingly refreshed when I emerged from under the covers into the brutal cold of Raurimu at 6AM…
I liked the concept of Jen Rice’s jalapeño cornbread and liked my first attempt at it but it didn’t rise very well. I’m not sure if that is just down to me, the use of beer as a yeast, or the specific beer that I used. It did have quite a good kick though, which is kinda the whole point of putting jalapeños into anything…
To address the rising issue, the next time, I just added the corn and jalapeños into my normal bread mix for the breadmaker. I didn’t reduce the water enough to compensate for the moisture in the corn and jalapeños but it still rose OK although the greater bulk meant that the jalapeño effect was a lot more subtle – it still got a thumbs up from the taste team though…
high-grade flour 1 cup + extra for kneading and dusting
wholemeal flour 2 cups
salt 1 ½ teaspoons
Rosemary 2 tablespoons finely chopped
extra-virgin olive oil 2 tablespoons
Method
Cook the kumara in boiling salted water until soft, about 10-15 minutes. Drain well and mash with a little salt to taste.
While the kumara is cooking, combine the yeast, sugar and warm water in a bowl. Leave on the bench for about 10 minutes until frothy.
In a large mixing bowl, combine the flours, salt and rosemary. Add the oil, mashed kumara and yeast mixture, and mix until well combined. If the dough is too wet, you may need to add a little more flour.
Knead the dough for about 10 minutes on a floured surface, adding a little extra flour as needed, until dough is soft and elastic.
Place the dough in a lightly oiled bowl, cover it with a tea towel or clingfilm, and leave it to rise in a warm place for about 30 minutes – it should have doubled in size.
Line a baking tray with baking paper. Cut the dough in half and shape into two loaves. Place the loaves on lined tray and cut a few 1cm-thick slashes on top of them with a knife.
Now would be a good time to preheat the oven to 200 degrees Celcius
Leave the dough to rise for a further 20 minutes or so.
Dust the loaves with a little flour. Bake for about 25-30 minutes or until a crust has developed and the base sounds firm and hollow when tapped. Remove from the oven and allow to cool a little before slicing.
The only changes I made to the recipe were to zap the kumara in a microwave steamer instead of cooking it in a pan; using only high-grade four with a 1/4 cup of bran flakes to add the wholemeal content – this is how I do my wholemeal bread and it seems to work out OK; and I’m using black sea salt for all my salt contributions…
Pink…
…pink…
…turns black when wet
I had bought some active dry yeast last year for my pizza experiments – although I had done a few pizzas since, I hadn’t checked the ‘best by’ date which was some time in February. The yeasting issue was in doubt for a while – we can’t just pop down to the supermarket here: the closest one is 40km away, the closest 24 hours one a good two hours away – but everything eventually frothed up nicely after a half hour or so…it helped, I think, putting the bowl up in the mezzanine for a while in the warmer air from the fire…night-time temperatures here have been below zero the last couple of weeks…
Once the kumara bread was safely in the oven, I made up another batch of dough, waited another 30 minutes for the yeast to do its thing and swapped out the kumara and rosemary for a can of drained corn kernels and a half cup of drained pickled jalapeños – you simply cannot buy them fresh here, it would appear – and completed the recipe as above…
As you can see above, the finished loaves look pretty good and they taste pretty good too…I have been toasting 3-4 slices each night to dip into my dinner soup and lunch today will be toasted cheese (still trying to polish off the last kilo brick that I had in the freezer) on jalapeño bread…
This recipe seems to be a keeper for bread from scratch. It is very simple and painless and makes two loaves versus one from the original recipe I was using. The loaves will freeze well and so I may do a stock-up bake in the next couple of weeks: even with the cost of the can of corn and the jalapeños, it is way less expensive than buying speciality loaves from the supermarket…
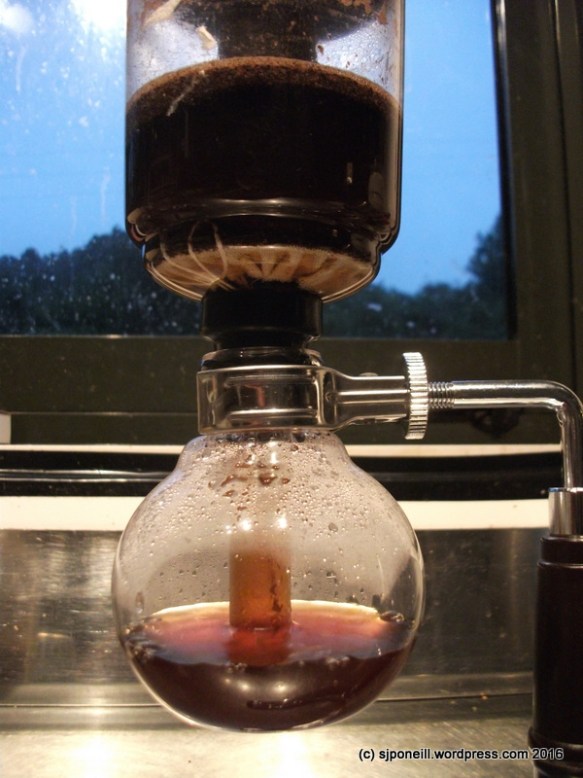
A coffee syphon…nope, I’d never heard of one before either but stumbled across the idea online when looking for something total unrelated…
The basic idea is that a syphon gives you a smoother brew because if keeps the heat source away from the coffee, thus eliminating any chance of burnt coffee…picked one up on Trademe around September last year. It has a certain decorative appeal and I never actually used it until just a few weeks ago…
It’s a simple device…water goes into the spherical lower chamber, the heat from the burner forces it into the upper chamber where it mixes with the coffee grounds and then, when the heat is removed, returns through the filter back to the lower chamber as coffee…
The recommended approach is to pre-heat the water in the jug so that there is no messing around warming it from cold. The spring thing you can see at the top of the chamber is the spring-loaded wire that holds the filter in place against the bottom of the upper chamber…
All the water is now in the upper chamber and held there by the steady heat from below…
Add the coffee and gently stir before letting it sit for a minute. The idea is that the beans should be ground only after the top chamber is full of water sot hat the fresh grounds go directly into the hot water. I’ve tried that and using pre-ground grounds and haven’t seen much of a difference so far…having said that, both my brews (yes, a whole two!) have been quite weak sot hat I may need to beef up the quantity of grounds. It may be that the limited sit time for the coffee i.e. not sitting for longer as in a plunger or being forced through the grounds as in an espresso machine, is not drawing out as much flavour as other methods..?
As soon as you remove the burner, the coffee will start to filter back into the lower chamber…
It takes less than a minute for all the coffee to draw back into the lower chamber. To me this looks too light in colour hence my thought that I need to beef up the quantity of grounds…
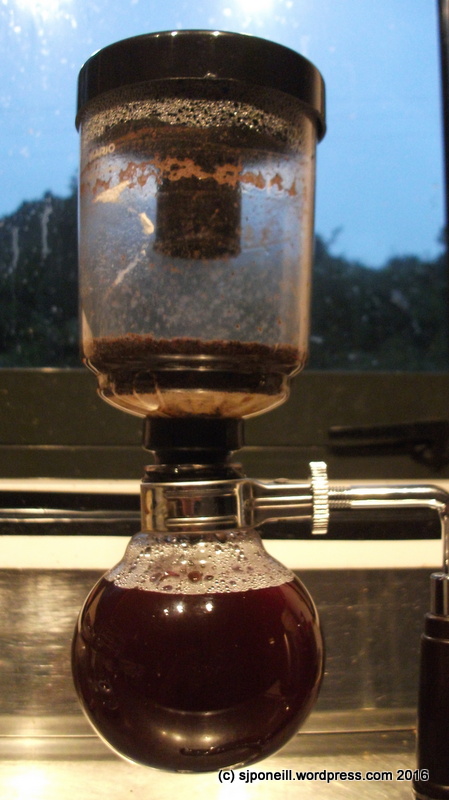
I tried frothing my DIY almond coconut milk in the espresso machine…it does froth better than the commercial stuff tin a carton but not as well as I’d like.
Some Google research implies that the reason that real milk froths so well is that levels of protein. if that is the case, adding some protein to the coconut almond milk may encourage better frothing… I bought some protein from the supermarket and will try this in my next brew – I am limited to a brew a day so I don’t go completely hyper so this may take a while…I’m thinking that it’ll only need a 1/4 teaspoon if that…
The coffee complete does have a nice hint of coconut but the coffee itself leaves a bit to be desired, both in the ‘hit’ and in the flavour…it may be that I am trying too many things at once and need to separate mastering the syphon from my mastery of frothed almond coconut milk…
If the syphon doesn’t end up performing, at least it is a nice decoration for the kitchen…
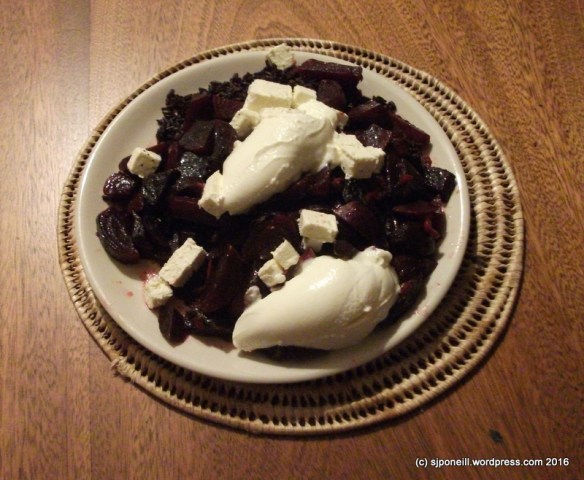
This is one of those kitchen experiences where everything just came together perfectly…a dream to prepare and more so to consume…
The foundation was another of Jen Rice’s cracker recipes, Roasted Beets With Goat Cheese And Honey…if you have any interest at all in spicing up your kitchen and your diet, you really must check out Jen’s site Sugar Soil: it’s chock full of great ideas and cues to try different ingredients. Living in rural New Zealand, our local shops don’t have the same range of more exotic items as larger centres: at the moment, I’m making regular purchases from Happy and Healthy for things like root tumeric, agar, black rice and bulk almonds and chia seeds.
Anyway…as I’ve discussed on a couple of occasions previously, my green journey is driven by a desire to eat and be more healthy and less by any philosophical issues – although the Hot Doc’s insights into what gets pumped into commercial chicken and cattle gives me pause – so I’ve not gone entirely vegetarian or diary-free, just adjusted my habits for more healthy outcomes…which is why I’m quite comfortable with the dairy content of this particular dish…
As you can see, it is quite simple to prepare but I did make some minor changes:
I thought that I was buying baby beets at the supermarket: I was but it was only when I opened the packets to actually use them that I realised that they were precooked. I should have and will in future just buy normal beetroot.
Jen’s cooking time for this is up to four hours in the oven – I don’t get home from work til around 6 and there is no way that I will be waiting til after 10PM for dinner. My cunning plan was to just toss it all in the slow cooker while I was at work. This sounded like a good plan until I found that the beets were precooked.
I wanted a rice base to bulk it out as a meal – as writ in the original recipe it is more a snack or an entree than a meal in its own right – so set up a cup of black rice to pre-soak through the day so that the only cooking and delay in the evening would be cooking the rice.
I couldn’t find any goat feta locally so opted for the stuff from cows…I think I’ll survive.
I used black sea salt instead of normal salt – I bought some of this just to try but then found I had run out of normal salt any way so it is going into anything calling for salt.
I warmed the honey so it would mix better with the balsamic and spread over the beets.
I was worried that the precooked beets would just turn into mush after a day in the slow cooker. I needn’t have worried as they were still nice and firm when I nervously lifted the lid off that evening.
From there it was just a matter of flicking the rice cooker to ‘cook’ and dicing up a third of the feta…and then racing up to the National Park Village just before it closed to get the Greek yogurt that I had forgotten on my way home – they had none so I had to settle for natural yogurt: not a biggie for this non yogurt connoisseur. They only had a mega container though so will be applying yogurt to the next week or so of meals just to burn it up…
Yes, my plating still needs work but OM-bloody-G!!! Did this taste good or what??? The best meal I have eaten in a long time – if I do say so myself – even better than the coriander tacos from Eatin Ohakune or my meal at Kokako the last time I was in Auckland and I COOKED IT!!!!
The challenge now is to be able to recreate this success next time. yes, it is possible that the sugars in the beets and the honey contributed to some extent to my sky-rocket level of satisfaction and enjoyment but then my serving also filled me up…
Whether by accident, chance or skill (most likely one of the first two!), this meal offers a great combination of texture and flavour:
The soft smooth beet, yoghurt and cheese is offset by the texture of the black rice.
The sweetness of the beets and rice is balanced by the more tart cheese and yoghurt.
Even the colours work well with the dark red of the beets and the black of the rice contrasted nicely by the lighter cheese and yoghurt.
There’s not really anything that I would change about my ingredients or preparation of this dish – if it ain’t broke… – other than use raw beets next time and see if I can find some Greek yoghurt…This was the first time that I had used the black sea salt and the black rice but both performed well: many recipes mention the need to soak the black rice overnight but it came out well after soaking through the day and also came out of the rice cooker, even after presoaking, better and cleaner than normal white rice…


 A month or so ago, we had a series of minor domestic disasters that led to a flood under the kitchen wall into the back pantry. During the resulting rapid relocation of the pantry’s contents, I uncovered a dehydrator. I always sorta kinda knew it was there but had never been that inspired to pull it out and give it a whirl.


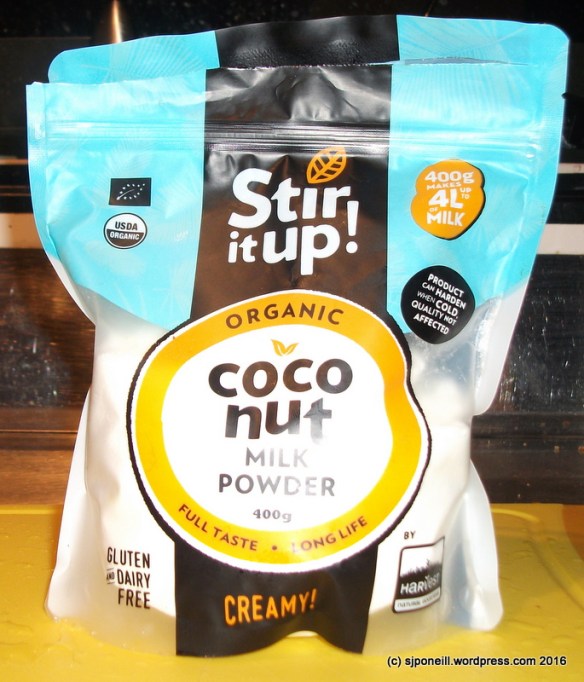
 I’ve been eagerly awaiting the launch of the Harvest Stir It Up range of non-dairy milk powders – not in the Taumarunui New World today …grrrr – and found the link to Kimberley’s
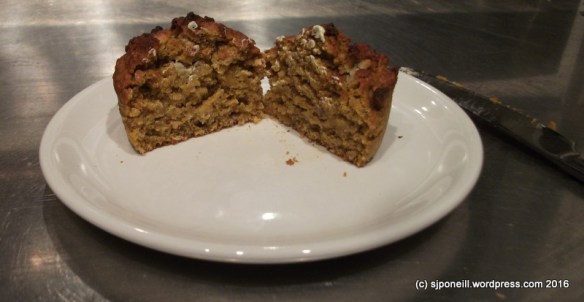


 For this week’s challenge, share a photo of something pure — it can be a person, an object, or a moment.