DIY Almond Coconut Milk

My green journey began after the reducing dairy conversation with Bubble…my initial resistance was based on the impossibility of life without cheese, yogurt or ice cream, all of which quickly found dairy-free alternatives for…”Plus think I have mastered the bannoffee breakfast drink now and must have milk for that!!” The comeback “Sometimes milk is needed (e.g. nice cafe latte) other times vanilla almond milk is great (smoothies, cereal and instant coffee!)” set me on the path of alternative milks.

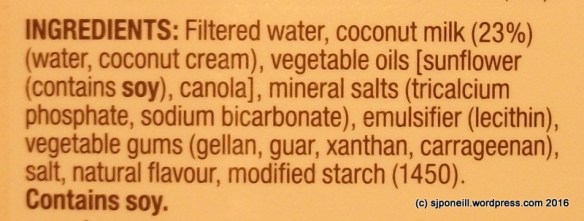
Until this point, I had only associated alternative milks with soy which I never much liked: that there might be other options out there was total news to me…I always pushed obliviously past those shelves at the supermarket. I started out with prepacked almond and coconut from the supermarket but was never that comfortable with all the big words in the ingredients panel on each package plus each empty package = waste…

It didn’t take much Googling to learn that making my own almond, coconut or almond coconut is actually quite easy, actually so easy that I wonder why anyone would bother with the store-bought packs..? I’ve expounded the benefits to a lot of people online and in real life and I thought that it’s probably past time for a bit of a tutorial…

DSCF0447

I have a dedicated blender for milk making…it was only $24, heavily discounted at Briscoes…the advantages it brings to the game is that it has the capacity to hold the nut and 1.2 litres of water, and I can pulse the mix every ‘while’ as it sits.I used to use my bullet blender but had to amalgamate the mix in a separate bowl.

DSCF0448

The raw materials: I buy the chopped almonds in 3kg lots from Happy and Healthy, and the coconut chips in 1kg lots from Bin Inn or similar bulk stockists. I add a cup (approx 100 grams) of each to the blender and cover it with boiling filtered water – our water here is all rain water, but we’re well into the filtering habit and it doesn’t do any harm…

DSCF0450

Pulse the mix of nuts and boiling water for a minute or so…I think that the boiling water helps bring out the oils and flavours from the nuts…

DSCF0451

It’ll look something like this..DSCF0453

Top it up to the Max mark with cold filtered water – you could use more boiling water but I don’t thing it adds anything and you would need to be a lot more careful pulsing the mix until it cools down…

DSCF0456

Let the mix sit for a few hours or preferably overnight, giving it a quick pulse stir up every time you walk by or get bored…

DSCF0501

After sitting overnight, the milk has separated into the meal at the bottom and the oils and good stuff has risen to the top…the same happens in the bottle hence the good shake before use…

DSCF0458

Spread your filter cloth over the target bowl. My filter cloth is polyester voile I bought as a bulk end lot from Spotlight ($12 for 5+ metres)…I just sliced off a half metre square and find this much easier to use than nut milk bags which are also more expensive and harder to clean.

DSCF0459

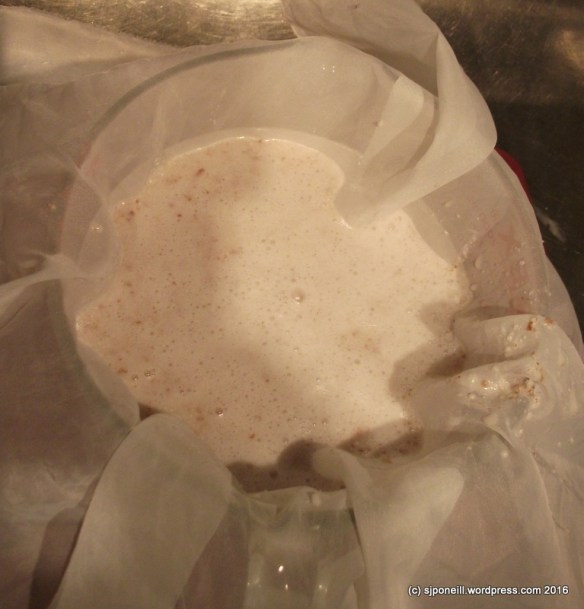
Pour the mix into the centre of the cloth…

DSCF0460

Draw in the edges and let the bulk of the liquid drain through into the bowl…

DSCF0461

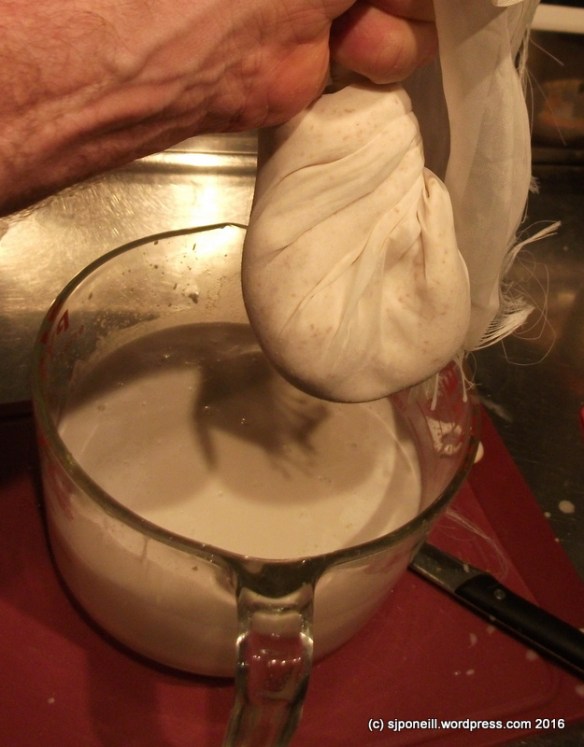
Hold the top of the filter cloth and twist the ball of meal so that the tightening cloth squeezes the remaining liquid into the bowl…

DSCF0508

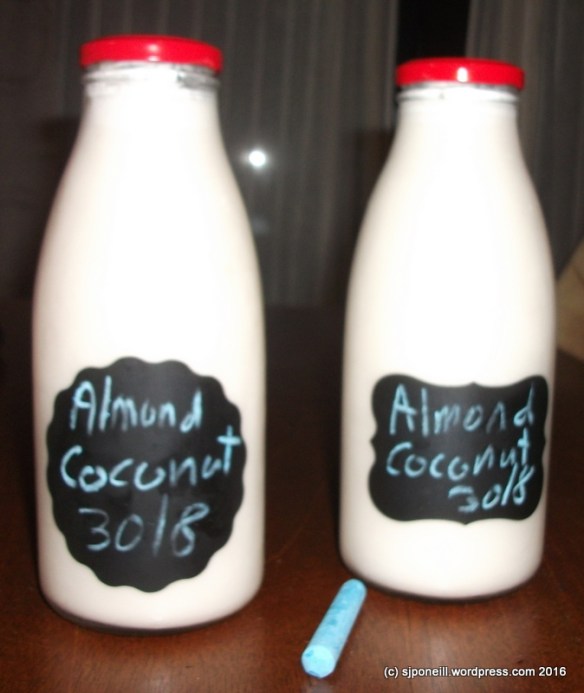
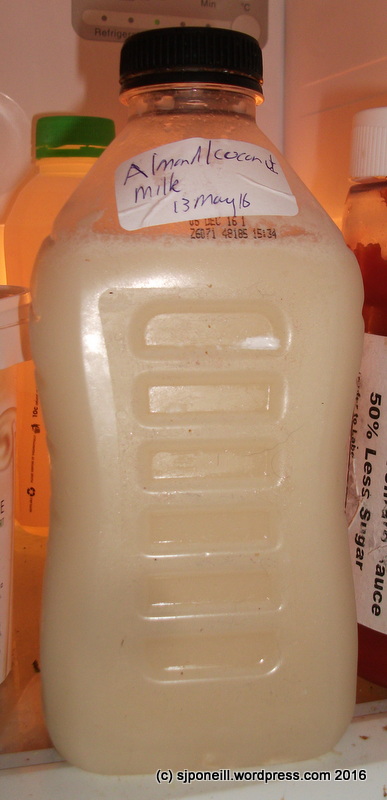
Voila! one litre of almond coconut milk, fresh as with no big words or other additives. This will last in the fridge for a week. It will settle and will need a shake before you use it. I use this any place I would previously have used milk except for cheesemaking where it probably will not work (haven’t actually tried that) but may still be doable for dairy-free cheese (also not tried yet – with this milk)

I save the leftover almond coconut meal to use in baking. I generate a lot of it and so dry it over the fire or in the oven after baking (I switch the oven off and let the residual heat do the drying) and store it in a sealed container until I need it.

I use the meal in bread (1/2 a cup into every mix), almond coconut cookies, as a substitute for flour-heavy recipes and also recently used it to absorb the additional fluid when I put too much milk in the mix for my roast baby armadillo recipe

DSCF0509


DIY Almond Coconut Milk

DSCF0098

As I’ve progressed along my green journey, I have started to become more discerning about my healthy alternatives.

One of the themes in Damon Gameau’s That Sugar Story/Movie (depending on whether you are reading the book or watching the movie) is that much of what is pitched at us as ‘healthy’ isn’t really. There are the obvious villains like sugars concealed in health bars and even in meats as I found with my little adventures with the pre-crumbed chicken cutlets from New World.

One learns to become quite discerning even amongst the apparently acceptable healthy alternatives. I’ve been quite happy with my change from dairy milk to almond or coconut milk (from the supermarket) but when I looked at the label recently (see above), it has just a few too many big words on the ingredients label for my liking…an alternative milk is not naturally the same colour or texture (something I know a lot about because optimum consistency for airbrush paints is that close to milk!) as real milk: that it is when poured from the carton is a marketing decision, not a natural process.

Something I like about opting for a more healthy lifestyle, apart from the obvious benefits, is that most alternatives are quite easy to prepare…yes, making your own almond milk will never attain the same level of convenience as dropping a few containers of milk into the shopping trolley and, yes, you do need to be just a little more organised in terms of ingredients and preparation…but neither the decision, its sustainment or the work are that difficult…

Locating a suitable recipe for DIY almond coconut milk – I’ve always been a sucker for coconut – Google is your friend and, after sifting through a dozen or so variations of the theme, I came back to this one from Ethical Foods. My driver for this journey is one of health more than philosophy and when I look at a recipe, I consider it more from a practical perspective. However, I did like that the author lists some pretty good reasons for having a crack at making your own alternate milk, especially the one about the packaging.

There’s not much waste here from the foil-lined cardboard containers that these products come in from the supermarket: the plastic cap gets cut out and goes into the rubbish and the container gets sliced up and goes into the landfill on the back lawn (just filling holes). Even the foil lining breaks down and any plastic liner that might survives works its way to the surface for collection and disposal (there’s not much of it). But why deal with the waste products at all if you don’t have to…?

I’m not so sure about the ‘advantage’ of DIY almond milk being “…beautifully creamy white…” because almond milk is not naturally white: look at the inside of an almond: at best, it’s an off-white…

This is so simple to make:

Place a cup of almonds and a cup of shredded coconut in the blender and run it up to the maximum speed for a couple of minutes.

Empty the ground product into a bowl and add a litre of water.

Cover the bowl and let it sit overnight.

The next day, pour the content of the bowl in some double layered cheesecloth and wring the heck out of it into a clean bowl, ideally one with a pouring lip.

Once you have wrung all the liquid from the meal, pour it into a sealable bottle and store it in the fridge for  use.

DSCF0100

Easy!

The jury seems to still be out on the shelf life for this ‘milk’ so just keep an eye on it…anything over a week is probably pushing it…

The only down side to DIYing your own almond milk is that it does cost more: probably about twice as much compared to the store-bought stuff in the cardboard cartons.A cup of almonds is about 200 grams (@around $4 per 100 grams at the supermarket) plus about $1.50 for the coconut. The water here is free, coming directly off the roof, through a filter system and then being filtered again in the kitchen: this last step is probably unnecessary but the filter is right there so why not use it?

Buying almonds, especially sliced almonds, in bulk will close the cost gap and I will also experiment with using less almonds: some recipes only call for 100 grams but I’m not sure how strong they would be. I am also going to try blending the almond and coconut with the water to see if that strengthens the flavour…

The finished product has both an aroma and a flavour that blend the almond and coconut together so taste-wise this is a winner…give it a go…

Edit 24 May 2016

I’m not so sure about the ‘advantage’ of DIY almond milk being “…beautifully creamy white…” because almond milk is not naturally white: look at the inside of an almond: at best, it’s an off-white…

I got this wrong because I didn’t read the instructions properly. On my second go round making my own almond coconut milk, I blended the almonds and coconut with the water before letting it sit for the day.

DSCF0133 DSCF0134

Not only did I get a fraction more milk, maybe another 100 mls but what I did get had a very (cow) milk-like texture and colour.Like the commercial variety it also separates in the fridge but reconstitutes with a quick shake. My version version deposited a lot of sediment at the bottom of the bottle and needed vigorous shaking to mix in and didn’t separates into layers like this. teh flavours are also a lot stronger on this second attempt.

So the secret to good homemade almond coconut milk is to blend the solids with the water…I’ve identified a good source of less expensive almonds so will be making this every few nights from now on. Savings in the kitchen budget to offset the cost of DIYing will come drop dropping rice milk and reducing coconut water to an occasional.